

How to Attach Beads to Leather Bracelets: A Complete Guide
Creating personalized leather bracelets with beads allows you to express your unique style while mastering a rewarding craft. Whether you're a beginner looking to try your first leather project or an experienced jewelry maker seeking new techniques, learning how to properly attach beads to leather creates endless design possibilities. In this comprehensive guide, we'll explore multiple methods for securing beads to leather bracelets, the tools you'll need, and professional tips to achieve stunning results.
Understanding Your Materials
Before attaching any beads, it's important to understand how leather and beads interact. Leather comes in various thicknesses and finishes, each requiring slightly different attachment techniques. Thick, stiff leather might require pre-punched holes, while thin, flexible leather might allow for simpler threading methods.
Similarly, beads come with different hole sizes and materials. Glass beads typically have uniform, smooth holes, while natural stone beads might have irregular or smaller openings. Taking time to examine your specific materials will help you choose the most appropriate attachment method.

Essential Tools and Supplies
To successfully attach beads to leather bracelets, you'll need some basic tools:
For all methods, you'll need:
-
Leather cord or strip in your preferred width and color
-
Beads with holes large enough for your chosen technique
-
Sharp scissors or a leather cutter
-
Measuring tape or ruler
-
Clasps or closure mechanisms
Depending on your chosen method, you might also need:
-
Leather hole punch or awl
-
Beading needles or thin wire
-
Strong adhesive designed for leather and beads
-
Beeswax or thread conditioner
-
Fine-gauge wire and wire cutters
-
Pliers (round-nose and flat-nose)
Method 1: Threading Beads Directly onto Leather Cord

The simplest method works well with round leather cord and beads that have large holes.
-
Select a leather cord with a diameter slightly smaller than your bead holes. The leather should pass through easily but still provide some friction.
-
Cut your leather cord to the desired length, adding 2-3 inches for the closure. Remember that the cord will need to wrap around your wrist with enough overlap for a secure clasp.
-
If the end of your leather cord is fraying or difficult to thread, apply a small amount of clear-drying glue to the tip and allow it to dry completely. This creates a firm "needle" to guide the cord through the beads.
-
Create a plan for your bead placement. You might want to arrange them symmetrically, create a pattern, or place them randomly for a more organic look.
-
Slide the beads onto the leather cord in your desired order. If the beads are snug, avoid forcing them, as this could damage both the beads and the leather. Instead, very gently twist the bead while applying minimal pressure.
-
Once all beads are threaded, attach your chosen clasp according to the manufacturer's instructions. Button-style or hook clasps work particularly well with leather bracelets.
This method creates a clean look where the beads appear to float on the leather cord. However, the beads may slide if the cord is too thin, so consider adding small knots between beads if you want them to maintain specific positions.
Method 2: Using Adhesives to Attach Beads
For beads without holes or when you want beads to remain fixed in exact positions, adhesives provide a strong solution.
-
Select a high-quality adhesive specifically designed for both leather and the material of your beads. E6000, jeweler's epoxy, or specialized leather glue all work well, but always check compatibility with your bead material.
-
Prepare your leather bracelet base by cutting it to size and attaching any clasps or closures.
-
Plan your design carefully, perhaps marking light dots with a pencil where each bead will go.
-
Apply a small amount of adhesive to the back of each bead or to the leather where the bead will sit. Use a toothpick or small applicator for precise placement.
-
Press the bead firmly onto the leather and hold for 30-60 seconds to create initial adhesion.
-
Allow the adhesive to cure completely according to the manufacturer's instructions—usually 24-48 hours. Avoid wearing or handling the bracelet during this time.
-
Once fully cured, test the strength of the bond by gently pressing each bead. If any feel loose, apply a small amount of additional adhesive around the base of the bead.


This method works beautifully for creating patterns with flat-backed beads, cabochons, or irregular decorative elements that can't be threaded.
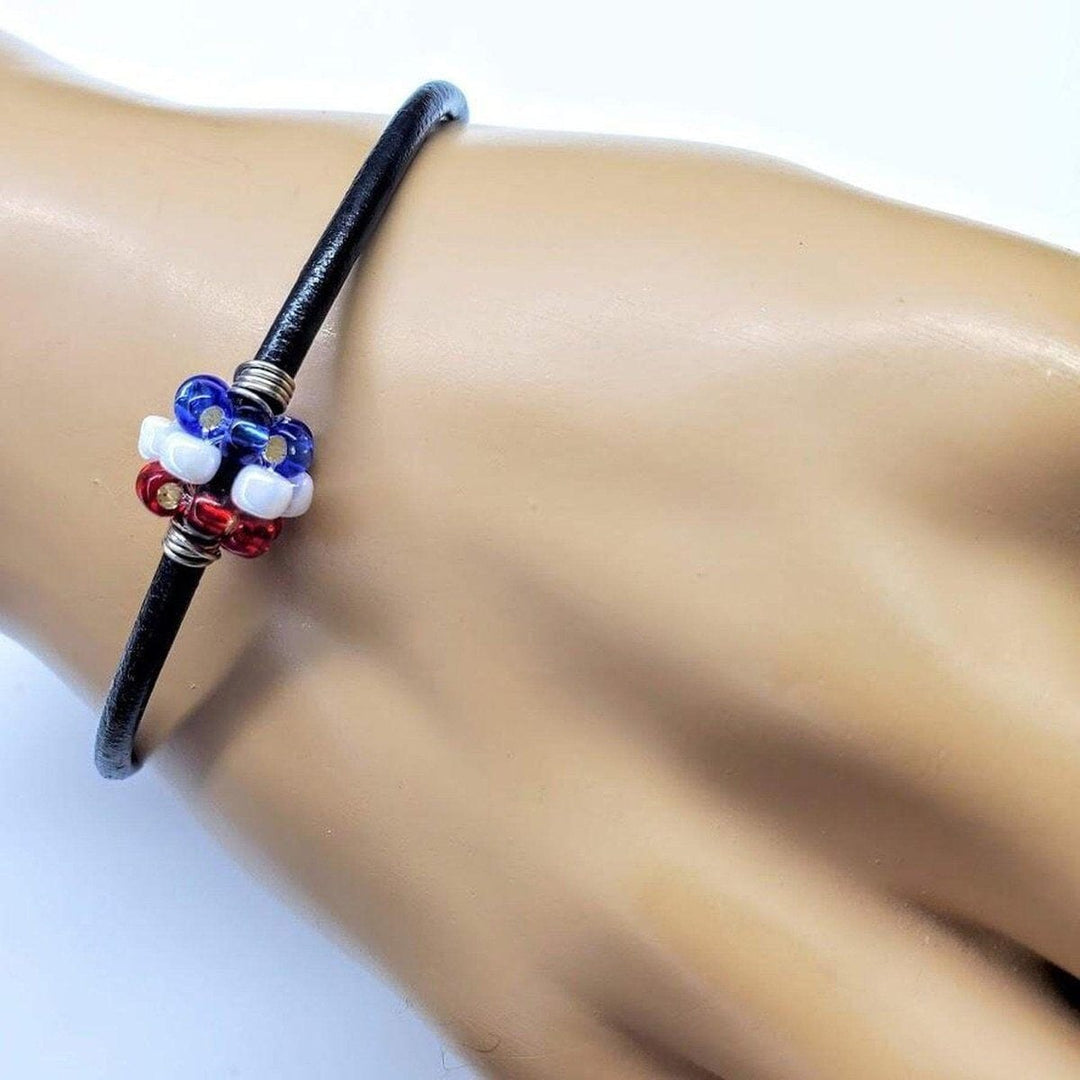
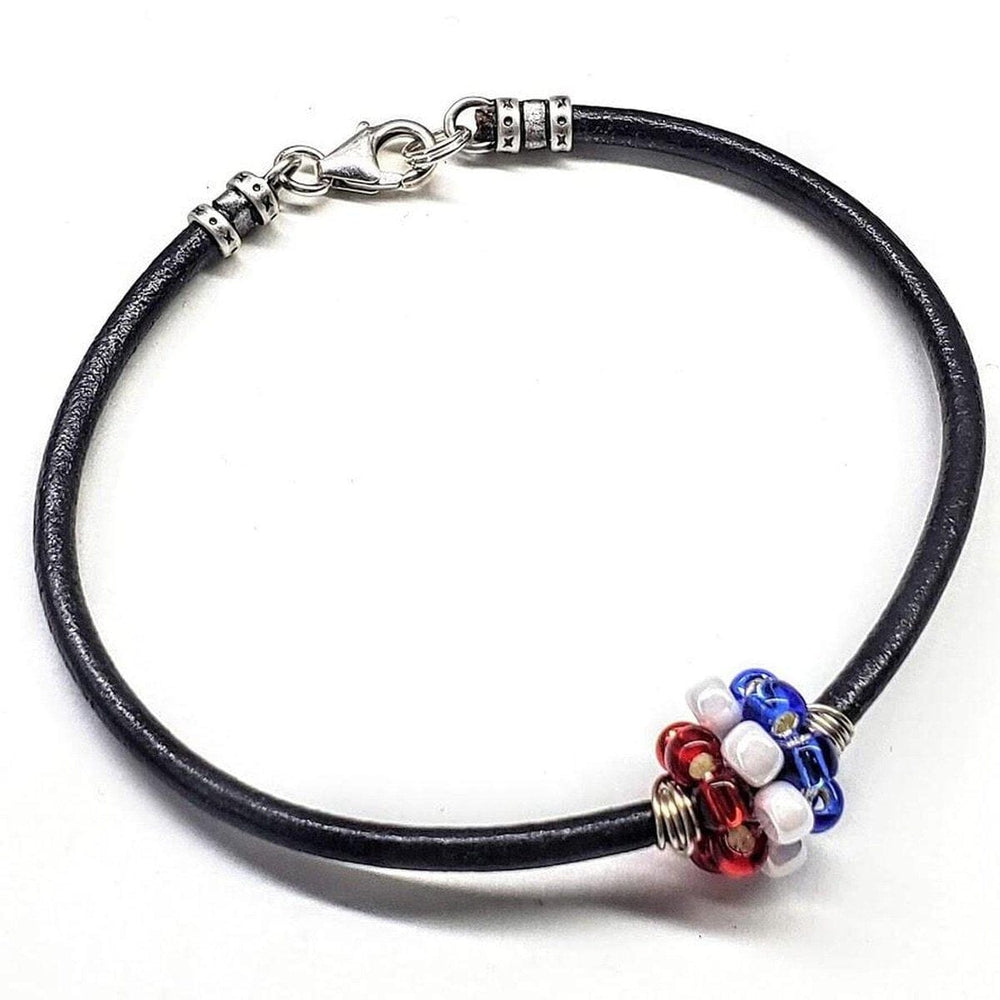
Method 3: Wire-Wrapping Technique
Wire-wrapping creates a sophisticated, artistic way to attach beads while adding decorative elements.
-
Cut your leather strap to size and prepare any closures.
-
Select a fine-gauge wire (26-28 gauge works well) in a color that complements your design.
-
Cut a piece of wire approximately 8-10 inches long.
-
Anchor the wire to your leather by wrapping it around the strap 2-3 times, keeping the wraps tight and neat. Tuck the end under the wraps to secure it.
-
Thread your first bead onto the wire, not the leather.
-
Position the bead where you want it on the leather, then wrap the wire around the leather on the other side of the bead, creating a secure "cradle."
-
Continue adding beads, securing each one with wire wraps on both sides.
-
When you've placed all your beads, wrap the wire around the leather 2-3 more times and trim any excess, tucking the end under the wraps to prevent snagging.

This technique allows for incredible precision in bead placement and works well even with leather too thick to thread through bead holes. The visible wire wrapping adds a decorative element that can become part of your design.
Method 4: The Pre-Punched Hole Method
For thicker leather straps or when you want absolute precision in bead placement:
-
Cut your leather strap to size and finish the ends appropriately.
-
Measure and mark where you want each bead to be placed.
-
Use a leather hole punch or awl to create holes at each marked location. The hole should be just large enough for your threading material (thin leather cord, waxed thread, or wire) but not so large that it weakens the leather.
-
Select a threading material strong enough to hold your beads but thin enough to pass through both the leather holes and bead holes multiple times.
-
Secure your threading material at one end of the leather using a knot or by stitching through additional holes.
-
Thread up through the first hole in the leather, through your bead, and back down through the same hole.
-
Pull tight to secure the bead against the leather.
-
Move to the next hole and repeat the process until all beads are attached.
-
Secure the end of your threading material with knots or by weaving it back through previous stitches.
This method provides excellent stability for heavier beads and creates a clean, professional look.
Troubleshooting Common Problems
If you encounter these common issues, try these solutions:
Beads that spin or move: If beads rotate around the leather cord, try using a tiny dot of clear adhesive between the bead and leather to stabilize them.
Leather too thick for bead holes: Consider using the wire-wrapping method or switching to the pre-punched hole technique with thinner threading material.
Adhesive that doesn't hold: Make sure both surfaces are clean and dry before application. Some bead materials (especially glass or glazed ceramics) may benefit from light sanding to create a better bonding surface.
Leather that stretches: Pre-stretch your leather cord before adding beads by gently pulling it several times along its length. This prevents your carefully spaced design from becoming uneven with wear.
Finishing Touches and Care
After attaching your beads, consider these finishing steps to enhance durability:
-
Apply a small amount of leather conditioner to any exposed leather to keep it supple.
-
Add a drop of clear nail polish or jewelry sealant to knots or wire ends for additional security.
-
Allow your bracelet to rest flat for 24 hours before wearing to ensure all adhesives and finishes are completely set.
To keep your beaded leather bracelet looking its best, store it flat or hung to prevent kinking the leather. Avoid exposure to water, excessive heat, or direct sunlight for extended periods, as these can damage both the leather and some bead materials.
Conclusion
Attaching beads to leather bracelets combines two beautiful crafting traditions to create wearable art. Whether you prefer the simplicity of threading, the security of adhesives, the decoration of wire-wrapping, or the precision of pre-punched holes, these techniques allow you to create professional-quality jewelry with personal significance.
As you become more comfortable with these basic methods, you might experiment with combining techniques or adding complementary elements like charms, metal accents, or leather stamping. Each bracelet you create will develop your skills and express your unique creative vision. As an additional Inspiration check out this designer Alexa Martha Designs


Leave a comment